
How To Treat An Ankle Sprain at Home
Physiotherapy for ankle sprain focuses on 4 stages of sprain healing, which is
1) reduction of pain and swelling,
2) increasing mobility,
3) strengthening muscles, and
4) improving balance & joint stabilisation to prevent future injuries.
What happens if you’ve just injured your ankle and can’t get to your physiotherapist anytime soon?
There are ankle sprain first aid tips that you can try to help reduce the swelling in your ankle and increase mobility until your appointment with your physiotherapist. Before taking on first aid, remember to check whether you have in fact sprained your ankle or fractured. Read more about differentiating ankle sprain and fracture.
It is important to begin the stages of healing as soon as possible. Swelling and bruising are normal in the initial period of ankle sprains (right after injury to about 7-10 days post-injury), but prolonging care may cause chronic (long-term) swelling and pain which lasts beyond the normal healing time.
Ankle Sprain First Aid
1. Avoid putting pressure on the foot
Take some rest to protect the injured ankle. This means staying off your feet, or using an assistive device (e.g. a cane, or crutches) while you walk to reduce the pressure off the injury for a couple of days.
2. Ice, Compress & Elevate (I.C.E.)

This acronym may be very familiar to those of you who have a history of sprained ankles.
Ice around the sprain helps to reduce the acute pain you may be feeling after the injury. It also helps to reduce the swelling by causing the blood vessels to constrict (become smaller) and prevents too much fluid from accumulating. Apply an ice pack to the area for 5-10 minutes every 2-3 hours, 1-2 days after the injury.
Compression involves wrapping an ankle sprain bandage or tape around the ankle to form a figure-of-eight ankle bandage support.
Elevation means keeping your foot elevated above the heart
Both compression and elevation help to assist the circulation of accumulated fluid away from the injured joint, and reduce swelling. All these can be done while applying ice (remember, I.C.E.!) during the first few days of injury!
3. Lymphatic Massage
Lymphatic massage is a slightly different form of massage than what we are normally used to. Instead of applying strong pressure to the area to release muscle tension like a normal massage, lymphatic massage relies on gentle sweeping motions to help move the fluid in the swollen joint away from the injured area, and reduce pain. This is usually best done if there is someone to assist you with it.
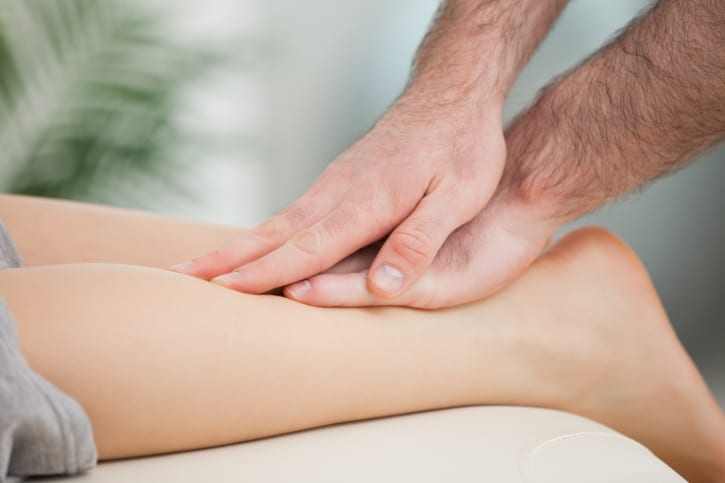
Perform a lymphatic massage while lying down or sitting with your injured leg elevated. Use your fingers to apply a light pressure around the injured area (tip: it should only go about 3-5mm deep). Maintaining that pressure, stroke upwards and away from the swelling and towards the back of the knee. Continue this for about 10 to 15 minutes, only moving upwards from the ankle to the knee. There shouldn’t be any pain, so stop if there is.
4. Mobility Work
Mobility work means performing movements around the ankle which promote circulation. In the early stages of injury, this may be difficult as swelling around the ankle causes reduced range of motion and the ankle may feel too stiff to move. However, it is important to keep moving it gently so that the ankle joints do not stiffen up and cause further complications in your recovery journey.

Ankle sprain exercise: point your foot upwards towards your body as much as you can, and then reverse that movement to point the toes away from the body. Then repeat that movement 30 times, every hour if possible. These are what we call ‘ankle pumps’. Performing these regularly will help to not only reduce the swelling but also to start activating the muscles around the injured ankle joint and prevent stiffness from worsening!
5. Gentle Assisted Stretching

Gentle stretching will help to prevent muscles in the calf from tightening up. After an ankle injury, it is common for muscles that support the ankle to tighten up in an attempt to stabilise the ankle which has become unstable (tearing of the ligaments may cause ankle instability). The calf muscle (gastrocnemius and soleus) is the main muscle which tightens up as it is one of the largest muscles crossing the ankle.
To stretch this muscle, loop a towel around the bottom of your injured foot and (very!) gently pull the towel towards you so that you feel a stretching in the calf. Hold it for 10 seconds, relax, and repeat 5 times. You may find that you can’t go very far because of the swelling, so don’t push it.
If you notice increased pain or swelling after doing these, stop! It may be too much for your ankle, and go back to Remedy 2 (Ice, Compress, Elevate) or Remedy 3 (Lymphatic Massage).
Treat Your Ankles with Care
All these remedies work to achieve one goal – to reduce the pain, swelling, and stiffness that usually occurs right after an ankle sprain. Do them right and you will usually see results in 5 to 7 days! However, be careful. An ankle that isn’t swollen anymore doesn’t mean that it has completely healed.
If you aren’t seeing results or can’t get back to your normal activities after your sprain, our practitioners are well-equipped to assess your ankles and get you on an effective treatment program right away. Give us a call or book and appointment today so that we can work together with you to get you back on track!